I know Halloween has passed, but I wanted to share the costume I made for my son. It is a great shirt to have around for trips to the park for some DisneyBounding. We are all about DisneyBounding in our family and if you are unfamiliar with the term, there is an explanation of it here.
So, as most people know 5 year olds change their mind a lot when it comes to their Halloween outfit. My son changed his mind about 7 times. I finally made him choose one and that would be what we stuck with. I cannot tell you how happy I was when he said Jack Skellington. I knew I could then make something that not only worked on Halloween, but he could wear on Disneyland days as well. I originally did not plan on making the whole outfit. I thought I would buy a shirt from the Disney Store and buy a mask. Well, when I saw the price for the Jack shirt at the store, I could not justify buying it. $25 for a shirt I could easily make at home with some supplies.
On the left is the shirt they sell at the Disney Store. On the right is the shirt that I made.
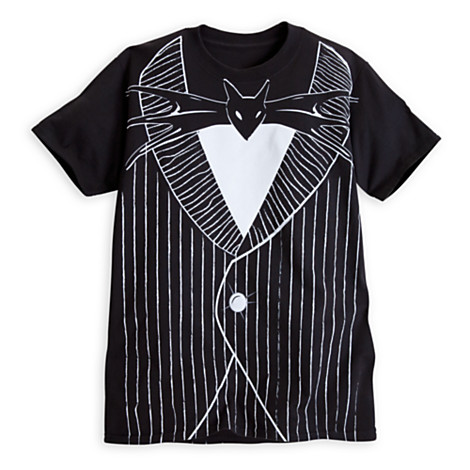 | 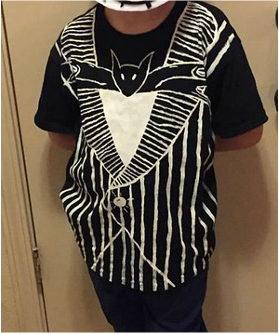 |
So, it does not look completely identical, but it is pretty darn close.
In total the shirt cost me about $3.50 to make. My supplies were a plain black t-shirt, white t-shirt paint, and a paint brush(I already owned one so it is not included in total cost). I got the shirt at Michaels and they had them on sale for 2 for $5. The fabric paint was $5.99, but I used a 40% off coupon and still have enough paint for at least two more shirts.
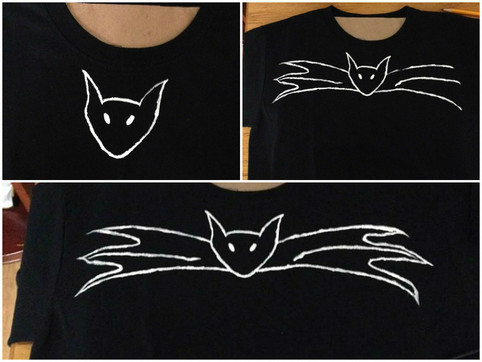
I have been fortunate enough to take many classes at the Animation Academy in DCA, so I am very familiar with drawing Jack's bat bow tie. Here is a video explaining not only how to make the bat bow tie, but also how I went about painting the bat onto the t-shirt. If you have never made the bat before or are apprehensive about painting it, try sketching it out a couple of times. It will help you better understand the spacing and practice is never a bad thing.
In total the shirt cost me about $3.50 to make. My supplies were a plain black t-shirt, white t-shirt paint, and a paint brush(I already owned one so it is not included in total cost). I got the shirt at Michaels and they had them on sale for 2 for $5. The fabric paint was $5.99, but I used a 40% off coupon and still have enough paint for at least two more shirts.
I have been fortunate enough to take many classes at the Animation Academy in DCA, so I am very familiar with drawing Jack's bat bow tie. Here is a video explaining not only how to make the bat bow tie, but also how I went about painting the bat onto the t-shirt. If you have never made the bat before or are apprehensive about painting it, try sketching it out a couple of times. It will help you better understand the spacing and practice is never a bad thing.
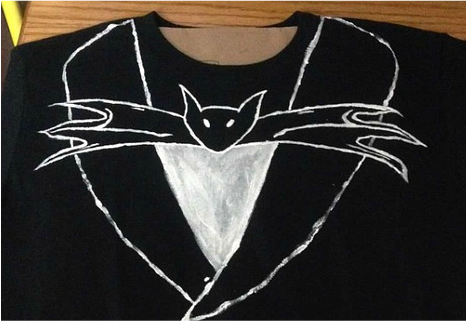
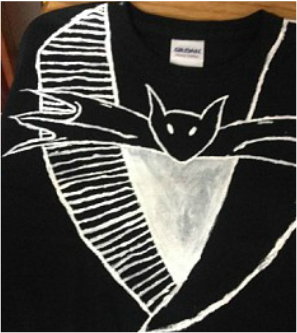
Here are some photos to show the progression of the bat on the t-shirt.
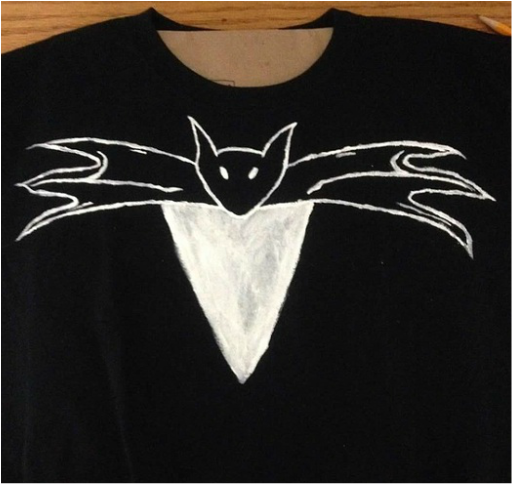
Now that the bat is finished, it is time to start making it look like a jacket with a shirt underneath. I started this by creating a deep V under the bat to represent the white t-shirt under Jack's jacket.
There is no right or wrong on how much of a V you make. This picture shows the V with one coat of paint applied. It took about 2 coats of white paint to completely cover the black underneath, that is why you see some smudges on my picture. I want to mention again that lines on this shirt do not have to be perfect. I originally was going to use a ruler to help with my line work and then remembered that the lines are supposed to be 'off'. If you just have to use a ruler or guide that is fine, but I think there is something so therapeutic about going about painting it with no guides.
Once the V is done and in place, you can start making the lapels for the jacket. I started this by continuing the V up the top side of the bat making sure that it matched up with the bottom half of the V and that it also stayed outside of the collar of the t-shirt. Once I brought the V to the top of the t-shirt I created the slight downward slope of the lapel. Make sure the slopes are about the same distance down the t-shirt. Then it is all about making sure the width of the lapels are about the same on each side as you come down to the crossover point. I made sure, while I was eyeballing making the lines, to do lots of little light strokes with the paint brush. You can see in the picture below where my brush either slipped or I accidently placed it down in the wrong area. That is ok because the pinstripes can be used to cover up those mistakes.
Once the V is done and in place, you can start making the lapels for the jacket. I started this by continuing the V up the top side of the bat making sure that it matched up with the bottom half of the V and that it also stayed outside of the collar of the t-shirt. Once I brought the V to the top of the t-shirt I created the slight downward slope of the lapel. Make sure the slopes are about the same distance down the t-shirt. Then it is all about making sure the width of the lapels are about the same on each side as you come down to the crossover point. I made sure, while I was eyeballing making the lines, to do lots of little light strokes with the paint brush. You can see in the picture below where my brush either slipped or I accidently placed it down in the wrong area. That is ok because the pinstripes can be used to cover up those mistakes.
I stopped my lapel lines around the bottom of the V to create the crossover area. I then pulled a line down from the V and finish off the outer side of the lapel. After doing that you just need to connect the left lapel line to the line that was pulled down from the V. This will make it look like it is tucked under the right side of the jacket.
To finish off the look of the jacket look you will want to create a curve for the right side, you can see it pictured below. In doing this you create a space for the button. Take that curved line down to the bottom of the shirt. That will complete the right side of the jacket. To complete the left side just go a few inches below the curve and create a diagonal line mirroring the right side.
To finish off the look of the jacket look you will want to create a curve for the right side, you can see it pictured below. In doing this you create a space for the button. Take that curved line down to the bottom of the shirt. That will complete the right side of the jacket. To complete the left side just go a few inches below the curve and create a diagonal line mirroring the right side.
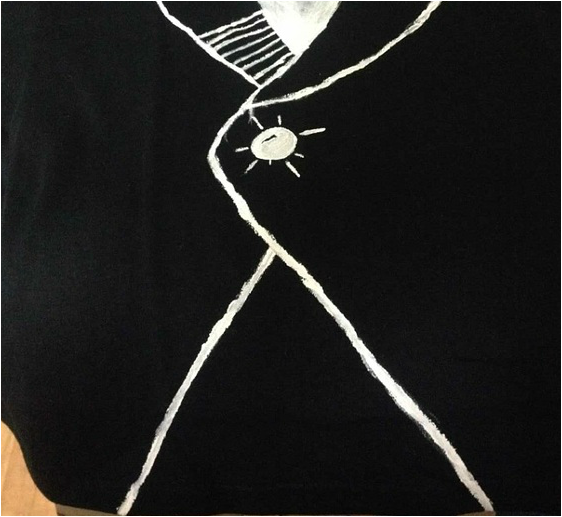
The button is just a imperfect circle with a slight highlight of black (pictured above). To create the highlight, before I painted in the button, I created an outline of a wedge shape and then painted button.I made a couple of accent lines around the button to show tension within the fabric, but it also accentuates the button.
The last thing to do is create the pinstripes. I started with the lapel and did the horizontal stripes. The stripes on the lapel were purposely made skinnier and more abundant than the pinstripes on the main jacket. It was just a design choice I made to help cover up mistakes, you do not have to do that. When doing the pinstripes on the lapel make sure to have the stripes follow the angle of the lapel. The horizontal pinstripes are a great area to put some wiggle in the lines.
The last thing to do is create the pinstripes. I started with the lapel and did the horizontal stripes. The stripes on the lapel were purposely made skinnier and more abundant than the pinstripes on the main jacket. It was just a design choice I made to help cover up mistakes, you do not have to do that. When doing the pinstripes on the lapel make sure to have the stripes follow the angle of the lapel. The horizontal pinstripes are a great area to put some wiggle in the lines.
 | 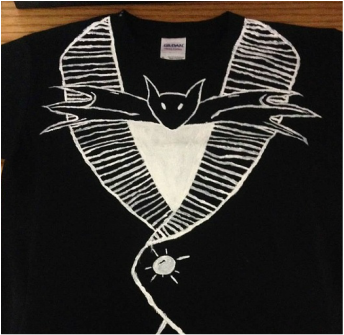 |
With the horizontal stripes done all that is left are the vertical stripes. I made these slightly thicker to save some time, pin striping takes FOREVER. You have now finished your very own Jack Skellington shirt!
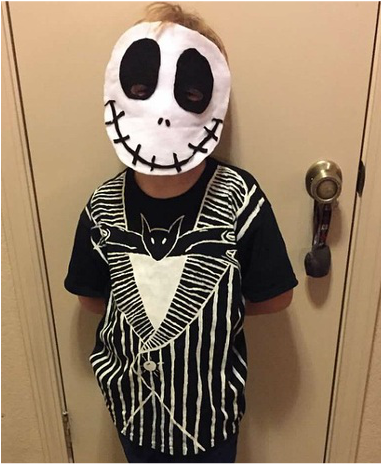
I did make the Jack mask for my son. I made from felt and a basic craft eye mask and used hot glue to assemble it. The mask was a quick job on the day of Halloween because he decided he did not want to paint his face, ugh...five year olds. =)
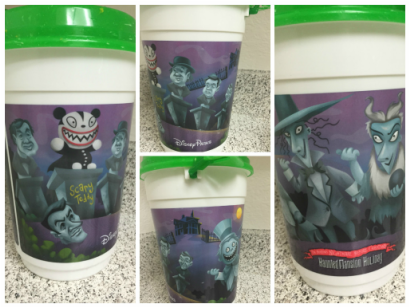
While in Disneyland last weekend I picked up this neat Haunted Mansion Holiday popcorn bucket. As much as I love it I am going to give it away to one lucky reader. I thought this would be a great giveaway since it has Nightmare before Christmas incorporated on it. I will warn you up front that there are a few minor scratches on it from a 5 year old dropping it, haha.
While in Disneyland last weekend I picked up this neat Haunted Mansion Holiday popcorn bucket. As much as I love it I am going to give it away to one lucky reader. I thought this would be a great giveaway since it has Nightmare before Christmas incorporated on it. I will warn you up front that there are a few minor scratches on it from a 5 year old dropping it, haha.
The contest is only available for people with a shipping address within the US and Canada.
 RSS Feed